Select a good nursery site-
Install your rice nursery in an accessible and sunny place close to the rice fields and water source, and sheltered from animals and birds. Do not install your nursery in the shade of trees, as this will weaken the seedlings.
Prepare nurseries-
Wet bed nursery:
It is done in regions having adequate water availability. Nursery area is about 1/10 of the area to be transplanted. Broadcast Pre-germinated seeds on puddled and levelled soil. Keep the beds moist for the first few days. Do not flood the beds. When the seedlings are about 2 cm high, keep the beds submerged in a shallow layer of water. Apply a dose of 26 kg/acre Urea about a fortnight after sowing. For transplantation use seedlings of 15-21 days or when seedlings are 25-30 cm long. Regularly irrigate the nursery.
Dry Bed:
It is prepared in dry soil condition. Total seed bed area is about 1/10 of the area to be transplanted. Make a seed bed of convenient dimensions with the soil raised at a height of 6-10 cm. Spread half burned rice husk on these beds for easy uprooting. Irrigation should be done properly because less moisture can damage seedlings. Incorporate basal fertilizer for proper nutrients.
Modified Mat nursery:
This is the modified method of nursery making which requires less space and less quantity of seeds. It can be cultivated at any place having a flat surface and assured water supply. The area needed is about 1% of the transplantable land. Establishing seedlings in a 4 cm layer of soil mix, arranged on a firm surface. Make a 1 meter wide and 20-30 meter long plot and spread plastic sheet or banana leaves on it. Place a wooden frame 4 cm deep and then fill the frame with soil mixture. Sow the pre-germinated seed in it and cover them with dry soil. Immediately sprinkle water on it. Irrigate the frame as and when needed and keep it moist. Seedlings are ready for transplanting within 11 to 14 days of sowing. Transport seedling mat to field and separate them and transplant 1-2 seedlings at 20×20 cm or 25 x 25 cm spacing.
Sowing in the nursery-
The quantity of seeds to sow will depend on the variety. For 1 acre of transplanted rice, you will need to sow in your nursery:
- 12 kg for long-duration varieties.
- 16 kg for medium-duration varieties.
- 25 kg for short-duration varieties.
- 4 kg for hybrids.
Tips:-
- Sowing your seeds in a wet-bed nursery if you live in an area with a sufficient water supply.
- Irrigate the nursery bed when water is required.
- Keep the water level between 2 and 5 cm.
Prevention for weed growth-
- Plow and harrow in a fallow field at least 10-14 days apart or after rain.
- Since weeds have already germinated, they should be visible.
- Apply permanent water early because weeds cannot germinate under water.
- Remove weeds from fields before applying fertilizers to your crops. Fertilizers would also feed undesirable weeds.
Fertilize the nursery-
- Apply the suggested amount of nitrogen fertilizer after 10 days of seedling emergence.
- The recommended amount of fertilizer is 16 kg of DAP per acre or 6.5 kg of urea per acre + 46 kg of superphosphate per acre.
- Apply as a top dressing into your nursery.
Bacterial Leaf Blight: Xanthomonas oryzae pv. Oryzae

Symptoms of damage-
- Seedling wilt or kresek
- Water-soaked to yellowish stripes on leaf blades or starting at leaf tips then later increase in lengthand width with a wavy margin
- Appearance of bacterial ooze that looks like a milky or opaque dewdrop on young lesions early in the morning
- Lessions turn yellow to white as the disease advances
- If the cut end of the leaf is kept in water it becomes turbid because of bacterial ooze.
Second plowing-
Plow in the transverse direction using a two-wheel tractor with a rotary, or if you use buffaloes, use the traditional plow. Plowing will help to remove weeds and break large soil particles into smaller particles. Plow across the field with the disc or tine harrow at least twice.
Broadcast the fertilizer into the soil (just before transplanting) and till lightly into the soil.
Repair bunds/dikes, destroy rat burrows, repair any holes and cracks, and re-compact the bunds.
Bunds/dikes should be at least 0.5m high and 1m wide.
Fertilize nursery before transplanting-
Broadcast 10% of your available nitrogen evenly on your field, all of your phosphorus and potassium, and incorporate the fertilizers just before sowing or transplanting as a basal dose slightly into the soil.
Apply 6 kg of urea/acre, 21 kg DAP/acre and 23 kg MOP/acre.
Do not use chemical fertilizer if you need more than a 5 kg paddy to pay for 1 kg of fertilizer. Fertilizers must be stored in a dry, cool place.
Do not apply high rates of fertilizer for traditional varieties, as they may have limited response and cause lodging.
Caution:-
Excessive use of nitrogenous fertilizers, particularly during flowering, causes sterility and consequently, a significant reduction in yield.
Leveling the paddy field-
- Level the field by using an animal-drawn wooden plank or riding-type leveler.
- Use a leveling harrower.
- Remove excess water in the field before harrowing.
- Apply a basal fertilizer mixture and harrow afterwards. The objective of adding before harrowing is to allow the fertilizers to get mixed well into the soil. The major fertilizers that should be added include nitrogen, phosphorus and potassium.
Prevent and control yellow stem borer
Prior to transplanting your seedlings to the main field, chemical and biological control methods exists to control and prevent damage from yellow stem borer:
Chemical control:- Always consider an integrated approach with preventive measures together with biological treatments, if available.
- Soak the roots of the seedlings in 0.02% chlorpyriphos for 12-14 hours before transplanting to provide protection from the attacks of stem borer for upto 30 days.
- Pheromone traps may significantly decimate stem borer populations.
- Use of resistant varieties.
- Monitor the seedbeds and fields regularly. Handpick and destroy egg masses in seedbeds and during transplanting.
Biological control:- Cutting the leaf-top before transplanting reduces the carryover of eggs from the seedbed to the field. Raising the level of irrigation water submerges the eggs deposited on the lower parts of the plant and also helps to control the populations.
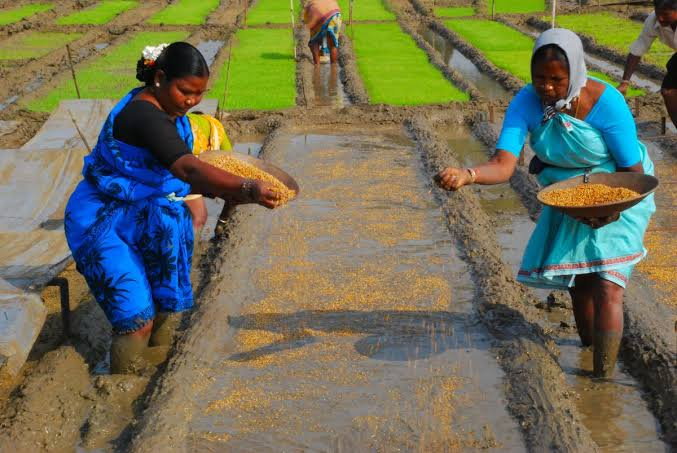
Transplanting of rice seedlings
Manual transplanting is suitable for fields with sub-optimal leveling and varying water levels. Transplant 20-30 days old seedlings from the rice nursery in lines with appropriate spacing into a puddled and water-stagnated field. Transplant them as fast as possible, ideally within 30 minutes of pulling out the seedlings. Plant your seedlings 20 x 20 cm.
- Pull out the seedlings at an average of 20-30 days after seeding (DAS) from nurseries and transport them to the main field. Traditional varieties can often be transplanted later than modern varieties with little effect on yield. Transplant the seedlings soon after pulling from the nursery in a puddle and leveled field (any delay will lead to slow revival or even death of some seedlings). The pulled out seedlings should be stored in water.
- Maintain the water level at 3-10 cm.
- Transplant 2-3m seedlings per hill at shallow depth at optimum spacing (20 cm x 20 cm or 22.5 cm x 22.5 cm). Handle seedlings carefully to ensure their fast revival and rapid growth after transplanting.
Pre-emergence herbicide in rice-
Use Butachlor 50 EC @ 1200 ml/acre or Thiobencarb 50 EC @ 1200 ml or Pendimethalin 30 EC @ 1000 ml or Pretilachlor 50 EC @ 600 ml per acre as pre-emergence herbicides, 2 to 3 days after transplanting. Mix any one of these herbicides in 60 kg of sand per acre and broadcast uniformly in 4-5 cm deep standing water.
Irrigation-
After transplanting, water levels should be around 3 cm initially, and gradually increase to 5-10 cm as the crop grows. The water levels should remain there until the field is drained 7-10 days before harvest. It is particularly important to ensure that continous flooding is provided during these critical stages:
- Panicle initiation.
- Booting stage.
- Heading stage.
- Flowering stage.
Leave a Reply